
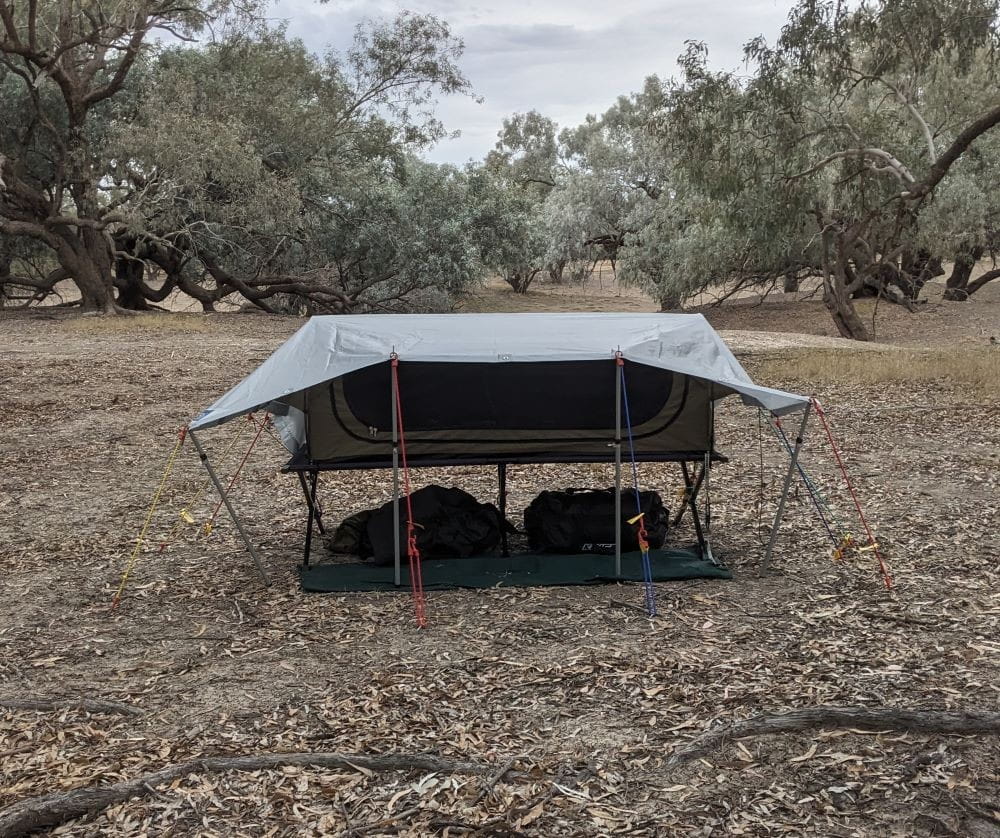
Camping: one of Australia’s favourite pastimes! There’s nothing quite like waking up at a campsite in the great outdoors to the sound of rain. That is, of course, unless your sleeping gear is getting soaking wet…
Sometimes, even our nice, fancy camping tents can fail, so an extra layer of protection is never a bad idea! One versatile addition to your camping kits is a lightweight, heavy-duty camping tarp. A well-pitched tarp can provide that extra protection, create a dry area for cooking and relaxing, and give you somewhere to shelter when the weather turns for the worse.
But getting the most out of a tarp takes more than just throwing it over a few trees. The angle, tension, position, and the campsite you choose all make a difference. So, if you’re wondering how to set up a tarp for rain or nasty weather, then here’s what you need to know before the next wet-weather camping trip.
Choosing the Right Campsite Before You Pitch
Funny enough, a good tarp setup for rain starts before you even unpack the tarp. Like a lot of things in life, what matters almost more than anything else is LOCATION LOCATION LOCATION! Try to set up camp in a spot less likely to be affected by rain or heavy wind and with a suspended shelter.
Look for a campsite with natural drainage and avoid low-lying areas where rainwater is likely to collect. A gently sloping site can help water run away from your shelter, while nearby trees can provide useful anchor points for your ridgeline. You’ll also want to think about where the rain and wind are likely to come from.
Take a moment to look overhead, too. If bad weather is approaching, position the tarp so its most protected side faces the prevailing wind and rain. Avoid setting up underneath dead branches or damaged trees, particularly if strong winds or storms are forecast.
Once you’ve found the right camping spot, you can start thinking about the best camping rain tarp configuration for the conditions.
The Angle That Actually Sheds Rain
The success of your camping configuration depends heavily on the angle at which you secure your tarp. The pitch of your tarp significantly affects how well it sheds rain and resists drag. A tarp that is too flat can allow water to collect in the middle, adding unnecessary weight and strain to the tarp and its attachment points, whereas a steeper angle gives rainwater an easier path to run off the sides.
For wet weather, an A-frame pitch is one of the simplest and most effective options. Run a ridgeline between two trees or other secure anchor points, then drape the tarp over it so both sides slope down towards the ground. The heavier the rain, the more important it is to create a clear path for runoff.
You don’t necessarily need to pitch the camping rain tarp right down to the ground, either. Leaving enough clearance for airflow can help reduce condensation while still keeping your sleeping area protected.
Step-by-Step: Pitching a Tarp for Heavy Rain
Ready to put your tarp setup for rain into practice? Here’s a straightforward six-step approach to pitching a tarp.
1. Find two secure anchor points
Look for two strong trees or suitable supports, spaced far enough apart to stretch your ridgeline. Make sure they’re stable and free from obvious damage. If there aren’t any suitable trees, you can use cambuckle straps, poles, bungee cords, or other tarp accessories instead.
2. Set up your ridgeline
Run a strong rope between your two anchor points. Keep the ridgeline taut, but avoid putting excessive strain on the tarp or attachment points. Less is more, especially when trying to avoid your tarp failing or tearing.
3. Drape the tarp over the ridgeline
Position the tarp so it sits evenly on both sides. For heavy rain, create a relatively steep pitch so water runs off quickly without pooling.
4. Stake out the corners
Secure each corner and adjust the tension so the tarp is taut without being overstretched. Where possible, use the ultrasonically welded eyelets for strong attachment to distribute tension evenly.
5. Check your runoff
Before settling in, look at the tarp from underneath. Is there anywhere water could collect? If so, adjust the pitch or tension. We recommend ensuring that water runs off away from your pitch rather than pooling in the middle.
Test your rain fly tarp by pouring water over it and watching where it flows.
6. Check the tension AGAIN
Rain, wind, and changing temperatures can alter the tension of your shelter. Give the guidelines and corners another check once everything is in place. A high-quality heavy-duty tarp should be secure enough to stay in position without being pulled excessively tight.
Best Tarp Configurations for Wet Weather
Different tarp configurations suit different weather conditions. The best tarp setup for rain will depend on your campsite, wind direction, available anchor points and how much shelter you need. Here are some of the most common tarp configurations suitable for wet and rainy camping conditions.
| Tarp configuration | Best for… | Why it works |
|---|---|---|
| A-frame | Heavy rain | Steep sides encourage water to run off quickly |
| Lean-to | Light rain, good airflow | Provides overhead protection while keeping one side open |
| Diamond point | Rain and strong wind | Creates a more enclosed wind-facing shelter |
| Low pitch | Heavy rain, exposed campsites | Reduces the amount of rain and wind reaching the shelter |
Choosing the Right Tarp for Rain-Heavy Trips
Your tarp setup is important, but the tarp itself matters too. For camping, you’ll generally want something that’s waterproof, durable, easy to handle, and suitable for how you intend to pitch it. ARK Tarps are made from XF Film and are designed to be 100% waterproof, UV-resistant, and tear-resistant.
If keeping your pack light is a priority, our lightweight tarps are designed for easy handling and are also suitable for camping and as a ground sheet. For more demanding setups, choosing a heavier camping tarp can provide additional strength where greater pressure is placed on the eyelets and corners.
FAQs
Can you pitch a tarp without trees?
Yes. Use tarp poles, trekking poles, or other secure supports with properly anchored guy lines.
How much clearance do you need between a tarp and a tent?
Leave enough space for airflow and drainage while keeping your tent protected from rain.
What size tarp do you need for a two-person campsite?
An 8 x 10 ft or 9 x 9 ft tarp can provide good coverage for two people, depending on your setup.
Do you need a groundsheet as well as a tarp?
A groundsheet adds protection from damp ground. ARK Camping Tarps can also be used as ground sheets or tent underlays.
Be Ready for Wet-Weather Camping with ARK Tarps
When the weather turns sour, a well-pitched tarp can make all the difference between a soggy campsite and a comfortable shelter. From choosing the right pitch to creating reliable runoff, a little preparation goes a long way. For a durable, lightweight rain tarp that’s ready for your next outdoor adventure, shop camping tarps online at ARK Tarps!
And if you would like to learn how to make your own suspended shelter, sign up for our free online guide.


 No products in the cart.